RGSS3的交互式Console
RGSS3的一个小小的控制台,可以即时输入脚本运行- -
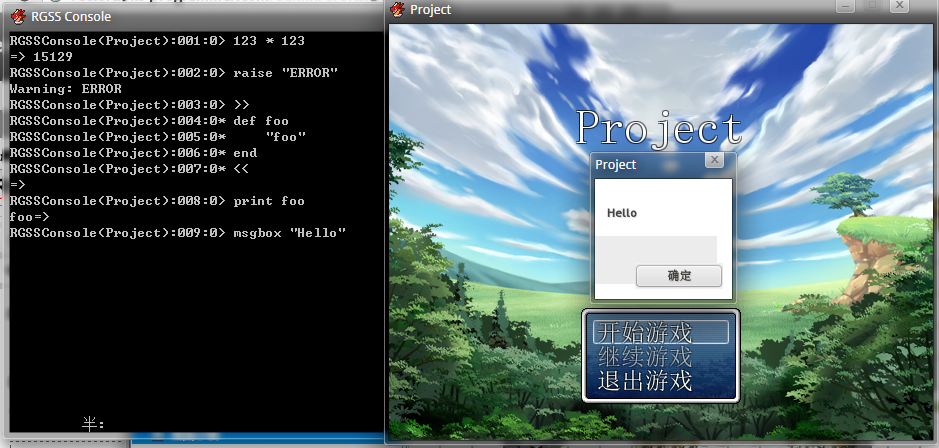
在控制台内输入 >> 可开启多行模式,再次输入 << 即可关闭.
下面扔代码:
#===============================================================================
# RGSS Console                                                     by Vctor29
#-------------------------------------------------------------------------------
# last update : 2012/2/6 22:43
#===============================================================================

RGSSConsole = Thread.new do
  DataManager.load_normal_database
  $RGSSConsoleLine = 1
  def msgbox(message)
    $msgbox ||= Win32API.new("user32", "MessageBox", "pppi", "i")
    $msgbox.call(0, message, $data_system.game_title, 0)
  end
  loop do
    begin
      print "RGSSConsole(#{$data_system.game_title}):#{$RGSSConsoleLine.to_s.rjust(3 ,'0') if $RGSSConsoleLine < 1000}:0> "
      $RGSSConsoleLine += 1
      line = gets
      if line == ">>\n"
        prog = ""
        loop do
          print "RGSSConsole(#{$data_system.game_title}):#{$RGSSConsoleLine.to_s.rjust(3 ,'0') if $RGSSConsoleLine < 1000}:0* "
          $RGSSConsoleLine += 1
          line = gets
          if line == "<<\n"
            break
          end
          prog << line
        end
        line = prog
      end
      print("=> ", eval(line, TOPLEVEL_BINDING), "\n")
    rescue SyntaxError, LoadError, StandardError
      STDERR.puts "Warning: #$!"
    end
  end
end
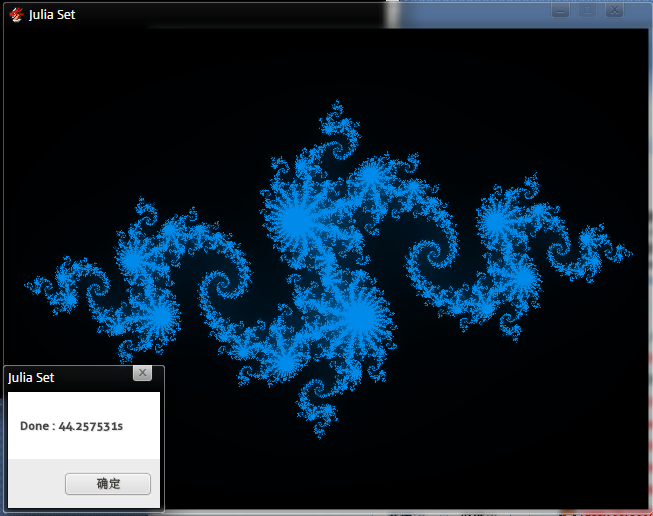
用RGSS3画Julia集
偶然间发现RGSS3内部定义了Complex类,于是拿他画了个Julia集.
以下为代码:
#===============================================================================
# Julia Set                                                        by Vctor29
#-------------------------------------------------------------------------------
# last update : 2012/2/3 23:06
#===============================================================================

Graphics.resize_screen(640, 480)

$sprite = Sprite.new
$sprite.bitmap = Bitmap.new(640, 480)

z = Complex(0, 0)
c = Complex(-0.8, 0.156)

t = Time.now

for x in 0..640
  Graphics.update
  for y in 0..480
    z = Complex(-1.6 + x / 200.0, -1.2 + y / 200.0)
    for k in 0..180
      if z.real * z.real + z.imag * z.imag > 4.0
        break
      end
      z = z * z + c
    end
    $sprite.bitmap.set_pixel(x, y, Color.new(0, k / 1.3, k * 1.3))
  end
end

msgbox "Done : #{Time.now - t}s"
loop {Graphics.update}
Hello World!
#include <iostream>

int main()
{
    std::cout << "Hello World!";
    return 0;
}